Posts

Web scraping using BeautifulSoup in Python : EAN number vs price from a German e-commerce website
Image
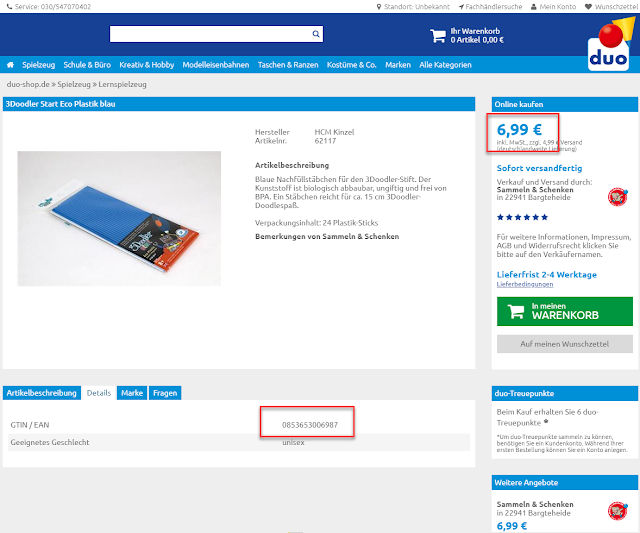
 Input : List of URLs of product category containing list of products to obtain information from. https://www.duo-shop.de/de-DE/List/4/0/0/ https://www.duo-shop.de/de-DE/List/5/0/0/ https://www.duo-shop.de/de-DE/List/70/0/0/ https://www.duo-shop.de/de-DE/List/259/0/0/ https://www.duo-shop.de/de-DE/List/72/0/0/ https://www.duo-shop.de/de-DE/List/73/0/0/ https://www.duo-shop.de/de-DE/List/9/0/0/ https://www.duo-shop.de/de-DE/List/690/0/0/ https://www.duo-shop.de/de-DE/List/329/0/0/ https://www.duo-shop.de/de-DE/List/537/0/0/ Task : Get EAN number and associated price for each EAN number. Output : Spreadsheet(or CSV) with EAN and price columns. Separate file for each product category. We begin by investigating the website to be scraped from. It's a german e-commerce website selling wide range of product(product type doesn't matter for what we're trying to achieve here). All product listing follow html structure, so if we can get information of one EAN, we can...

Building a local weather station using Raspberry pi W and Arduino Nano || Serial communication over Bluetooth HC-05 module

Image
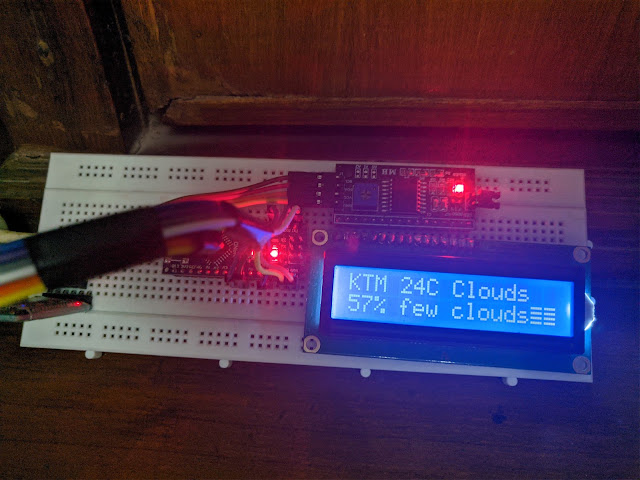
  So this DIY Weather Station involves a few different Hardware modules and a little bit of programming. The idea is, to display the weather status, temperature and humidity levels on a LCD Display that gets updated on a hourly basis. Our Raspberry pi W is going to host the programs and is responsible for sending the correct data from the internet to the Arduino Nano over a Serial communication. We'll make use of the bluetooth module to connect to the bluetooth capabilities of pi to send the data over to the display unit. Things required : Raspberry Pi Zero W x 1 Arduino Nano x 1 LCD 1602 Display x 1 I2C module x 1 Bluetooth HC-05 module x 1 Jumper wires for making connections 5V power source for both raspberry pi and arduino nano (we can power other modules from nano board) Setup Arduino Nano Our LCD Display Module can be connected to Arduino nano in two ways, with or without I2C module. Without it, we'll need to connect 8 pins to the Arduino which is tedious and time consumin...

Building a news app in react-native using Expo and Express on the Node.js server

Image
The blog post is divided into two sections, in first we will explore creating a basic server for our application. This server uses basic web scraping techniques to retrieve data from a trusted news portal. We are only scraping article title and article link, but can expand feature to include more data as well. In the next section, we will create an a cross-platform app from scratch for both iOS and Android. This app is going to retrieve the data from the server we created in Section 1 and display to the user. Section 1 Building a server : npm install --save express request-promise cheerio Add these dependencies to a new file newsAPI.js. const express = require("express"); const app = express(); const rp = require("request-promise"); const $ = require("cheerio"); app.use(express.json()); app.get("/", (req, res) => {   res.send("Hello !!!"); }); const port = process.env.PORT || 3000; app.listen(port, () => console.log(`http://localh...

Youtube not working in Vianet NetTV? Here's how you can fix it

 All Vianet users are aware that Youtube doesn't work in NetTV STB box provided by Vianet. The box is basically an Android OS 6.0 flashed with NetTV image, which means if you can access Play Store you should be able to install Youtube Android app and use it normally. Also, the method described here doesn't impact your regular nettv usage since you can go back to watching TV channels anytime. Items required : USB Keyboard and/or USB Mouse Google account (the one in your android phone if available) NetTV STB box setup connected to a TV display Steps : Unplug your ethernet cable. You'll instead connect to WiFi. Plug in your keyboard to the box and make sure it is turned on. Navigate to Settings and then Network. Select Wireless and connect to your home wifi as you would connect on a smartphone. Go back to home screen and on your Keyboard, press Windows Key( Win ) + B . This will open android browser. Navigate to  https://play.google.com/store/apps  and login using your googl...

Moving codebase from one git repository to other

Ever since github opened private repository feature to general user, all the developers have been moving their project repo to github. I myself too jumped on the bandwagon recently, and started putting up old projects as well as unfinished ones(there's a lot of those) as private repos in github. I had been taking shelter under gitlab and bitbucket as a backup place for them, but decided it was time to move them to github once and for all. Steps : 1. First I pulled the projects off of the old repo, using the following line :     git clone <git-project-url from old repo> 2. After getting inside the project directory, I used the following command to point it to my newly created repo in github.     git remote set-url origin <git-project-url from github> 3. I entered the following to confirm the change worked.     git remote -v Now, if you didn't have a README.md file on the previous repo, but github created one for you when you created the repo, thi...

Publishing your first app built using Expo to Android Play Store and iOS App Store without using a Mac hardware

This sounds like what a lot of beginner developers need right now. You make an app and you want it to be available to users instantly without having to distribute using pesky installation files or google drive links. Also, when you start out on Expo, you hear a lot of 'cross-platform' keywords being thrown around, and that's what brought you to Expo in the first place. Now that you're ready to start sharing, you need help publishing it to the stores and making it instantly ready, so you can focus on other things such as marketing, testing, feature upgrade and so on. This guide attempts to piece together what you'd need to for publishing your app to both android and ios store. And yes, you don't necessarily need a MacOS hardware for publishing to iOS App store. Once you're ready with making all changes, you're ready to build the production version. Pre-requisites Firstly, update the version code in your app.json file. This is done so that each time you up...

Enabling auto login feature in Windows

Autologin is not provided default by Windows. As a security measure, Windows wants you to keep a password login(PIN, password, fingerprint, picture, text etc) feature, but sometimes you'd want it to startup automatically for variety of reasons. A logged in system can be used with variety of startup applications, Kiosk interfaces, or even Remote Access feature such as VNC. It lets you make a cleaner setup out of your Windows machine. Also, if you aren't a Linux user, you will be able to setup home server in Windows machine after enabling autologin feature. Side note : You don't need autologin feature in Linux in order to use the machine as a server. The straightforward way to setup autologin is to keep a single account in the machine and disable password. However, you cannot leave your machine at the mercy of unauthorized access with this option. So, the recommended method is to setup an Administrator account with password, and setup auto login with a standard user. But t...

Exposing VMware linux server image's IP address to local area connection

Recently, we decided to move our SOHO RHEL server at office to a more permanent location. After powering it on in its new location, we discovered the network was not working. We used to log in to a static IP address of the device using ssh via PuTTY from our laptops to get into the server environment. We hadn't started doing a port configuration system yet, so it must have been something within the physical machine itself. When I joined the team the entire thing was already setup so I hadn't got a chance to look at how we were working with it so far, and this was an opportunity for me to go and take a look at it. Here's how we were using our server. A RedHat Linux Server Disk Image file running on VMWare Pro installed on a Windows 10 machine. First I thought it was a disk image issue and removed all image and configuration files from VMWare. After re-adding the disk image file the system booted perfectly but we weren't getting the previous static IP address as bef...

Developing a Twitter bot that lets me watch Youtube videos on random!

I have been getting back to building bots. I think bots are beautiful. Bots are the future. I just finished watching Altered Carbon first Season on Netflix and the Matrix-like world reminded me of how close we are to AI taking over. But I am getting ahead of myself. Check this out: Javi Reina - Alex Guerrero feat. Syntheticsax - Oig 2010 https://t.co/Jczom6C5L9 @sndpwrites #nWriter — nWriter (@nWriterdotcom) April 16, 2018 This post is going to be a part of a series of things I am working on with my bot. I'm having fun. My bot is listening to mentions at @nWriterdotcom. Currently I am filtering out any other tweets that do not have the hashtag ( #youtubeme ) so I can identify different sources of automated tweets(There's a lot).  Right now my bot does this : 1. Listen to mentions containing hashtag #youtubeme 2. Collect public username of source twitter account 3. Generate a random youtube video link with its full information. 4. Bundle it all together into on...

Working with string manipulation and basic file io operations in Python

Image
Last night, this tweet appeared in my timeline and caught my attention. The word "friends" is said in every episode of Friends. — Fact (@Fact) March 9, 2018 This doesn't sound right. There was no possible way to verify this and I expressed my concern over the same. A friend suggested counting the word in subtitle file for all episodes. I liked the idea, and a small weekend project was born. Before I give the spoilers away on whether or not it is true, I want to first clarify a few different things on how I got it done. I didn't have the subtitles file so I had to download them all before parsing the word "friends". I began by looking at websites that would let me download the english subtitle files the easiest way possible. Originally I had planned to use urllib   with BeautifulSoup to download the files but TV Subtitles made it really easy for me(kudos to the site developers btw). They let you download seasonwise bulk zip files of all episodes...

Top 6 things to do after installing Ubuntu and also save laptop battery life

I have frequently heard complaints about how Ubuntu is draining battery life of their laptop. While this doesn't happen in all the machines, it has happened to mine and I have had to search the internet to fix them. I have put together a list of a few things to do after a fresh installation of Ubuntu x.x. Not all steps mentioned below are required for conserving battery life, but they made sense when talking about a fresh installation of Ubuntu. 1. Get rid of Unity Desktop Environments are a integral part of your OS. They need to serve as good aesthetics in terms of design as well as a stable backend application. Unity is neither. You are better off with Gnome . Or, if your system needs to handle power-friendly DE, go for XFCE . I use i3 desktop manager but I wouldn't recommend it unless you have already used Linux for a while and are familiar with all the terminal commands. First remove Unity. sudo apt-get remove unity unity-2d unity-2d-panel unity-2d-spread unity-asset...

Home Alarm System using PIR sensor and buzzer(Simple)

Image
Lately there has been tales of burglars walking around in my community. They make their way into homes and steal whatever they could find. Hearing this, I thought I should develop a security system that would atleast alert people of intruders into their houses. The following are the things I used : 1. Arduino UNO 2. PIR sensor 3. Electric Buzzer 5V 4. 100 Ohm resistor The circuit is pretty simple. The PIR sensor has three pins, Vin, GND and Vout. I connected the GND and Vin to GND and 5V respectively of Arduino. I connected Vout to pin 2. Electric Buzzer has two pins Vin and ground that were connected to pin 10 and GND respectively. The buzzer heated up pretty fast so I connected 100 Ohm resistance between the ground and Arduino GND pins. I found a code here  that works with the setup I made. I uploaded it to the Arduino and tested it at different distances. I fixed it along the wall of the main hallway at the height of 5 ft to ensure its accuracy. Our code i...

Setting personal Home server with Raspberry Pi 3(with updates)

Lately i decided that I don't want my laptop running at all times for trivial tasks, like downloading files, checking mail and so on. Also I had to constantly move files around from my laptop to desktop to mobile phone whenever I needed something. Having a NAS(Network Attached Storage) would solve that issue by keeping all my files in one place. So, I decided to make a home server using my Raspbery Pi 3 that would cater to my needs. The process is pretty simple. 1. Install Raspbian. Lite will do. 2. Setup Raspbian with ssh and auto login enabled. 3. Setup Samba server. Installing Raspbian on a Memory Card is pretty straightforward. First using a card reader to connect it with laptop USB. Check device name using df -h . It is usually mounted as /dev/sdb, or /dev/sdb1, /dev/sdb2, ... if you have multiple partitions. Unmount every one of them with umount /dev/sdb . Then I extract the downloaded file to obtain an .img image file. Use of dd command as follows: dd bs=4M if...

Why NOT to root your android smartphone

Yes, it sounds a bit unorthodox. But I wanna point out that I am not discouraging you playing around with your phone's features. Yes, it unlocks a ton of features. But with great power comes great responsibilities. Whenever someone asks me to help them root their phone, I first ask them why specifically then want to root their phones. If I don't get a convincing answer, I don't help them and advise them not to do it. Because rooting phone exposes phone to a lot of security risks that weren't previously there. I want to talk about one specific one that I have personal experience with. So, recently I had my phone rooted, pretty standard procedure. Nothing out of the ordinary. I also installed a terminal emulator from the app store. I liked to browse around the filesystem in my phone. Looking at directories and comparing them with my laptop's Linux machine. And then I saw this line of command somewhere in the internet. rm -rf / Yeah, it looks bad. I g...

Trouble with youtube-dl in terminal?

"Signature extraction failed" For the last month or so, whenever I use youtube-dl to download a favorite lyrics video I was getting this error. EVERYTIME. I like my videos downloaded and saved, instead of having to open up a browser everytime I want to listen that same old song. Anyways, It suggested me to update the package and so I did. But apparently ubuntu repository did not have the latest package and it seemed like it wasn't updating it anytime soon. I checked the version and it was an old one last updated somwhere in the middle of 2016.  I was going to open an issue on yt-dl github page but got too lazy. So what I did was install it from python package manager instead of apt manager in ubuntu. 1. sudo apt remove -y youtube-dl 2. pip install youtube-dl It is working like before. Now I need to use pip to update my youtube-dl package(they release an update every two weeks or something according to their github page). I still would like to see what was causin...

Piping Twitter Feed into your Terminal!

Image
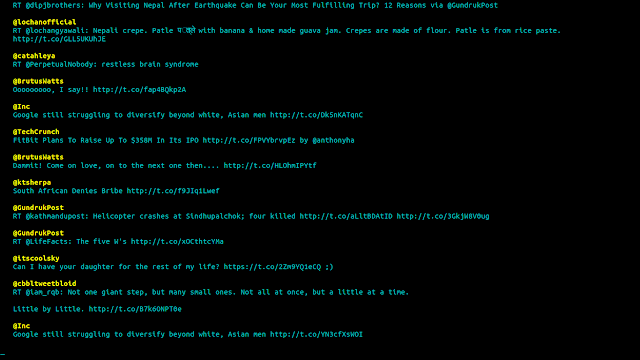
Alright, this is a very cool technique of displaying your twitter feed in your terminal. Along with display, this application called 't' can also post new tweets, replies, retweets(basically everything you do on twitter from a normal browser). Here is a picture of my twitter feed. $ t stream timeline So how to do this? Here are a few steps to be followed on a Ubuntu system(or any Debian-based system) Open up your terminal and type : sudo apt-get install ruby-dev Next, install the application 't' by typing the following : gem install t Go to  http://dev.twitter.com/apps/new  and register your application. Enter all details. Go to  http://dev.twitter.com/apps  and select your newly registered application. Click on Permissions tab and Select Read, Write and Access. Save your settings. Now, switch back to your terminal and authorize the application. t authorize This will open up your browser where you are asked to sign-in into your twitt...